
irssi IRC Client für Linux
Dieser Leitfaden verwendet Debian als Beispiel. Die Prozedur ist ähnlich wie für andere Distributionen.
Zu Beginn brauchen wir das Programm selbst. Öffnet das Terminal und nutzt den Paket Manager und plaziert es in einen Pfad eurer Wahl.
Der Paket-Manager sollte SSL installiert haben. Falls nicht solltet ihr dies nun tun.
sudo apt-get install irssi
Als nächstes das Programm ausführen. Im Terminal folgende eingaben machen:
irssi

Klickt hier für ein größeres Bild.
Die erste Ausführung ist nicht nur um das Programm zu Installieren gedacht sondern auch um das .irssi Verzeichnis im Home Ordner zu erstellen.
Gebt exit ein um das Programm zu schliessen. Als nächstes müssen wir den Klienten konfiguieren um auf das AnonOpsIRC-Netzwerk zu gelangen. Dies müssen wir in der Konfigurations Datei tun, am besten mit eurem Lieblings-Editor, welcher gewiss nano ist.
nano ~/.irssi/config
Die Beispiele sind aus einem bereits bestehenden und laufenden irssi Klienten kopiert. Ihr könnt dies in eure Konfigurationsdatei kopieren und dann speichern.
WICHTIG: Ihr müsst bei YOURNICK (Nickname) und YOURPASSWORD (Passwort) eure eigenen Informationen eingeben.
Als erstes den Server hinzufügen:
servers = (
  {
    address = "irc.anonops.com";
    chatnet = "AnonOps";
    port = "6697";
    use_ssl = "yes";
    ssl_verify = "no";
    autoconnect = "yes";
  }
);
Als nächstes fügen wir das Netzwerk mit ein paar Dingen hinzu:chatnets = {
AnonOps = {
type = "IRC";
nick = "YOURNICK";
autosendcmd = "/msg nickserv identify YOURPASSWORD; wait 2000";
};
};
channels = (
{ name = "#anonops"; chatnet = "AnonOps"; autojoin = "yes"; },
);
Nun habt ihr das Netzwerk dass ihr Betreten wollt eingestellt, den Nicknamen und das Passwort gespeichert und betretet den Hauptkanal automatisch.Ihr könnt dies später auch noch ändern, weitere Kanäle die automatisch beim Verbinden betreten werden hinzufügen etc.
Als nächstes haben wir Aliase hinzugefügt welche verkürzte Versionen von Standart IRC Kommandos sind.
Die Konfigurations Informationen unten werden hier zum Download angeboten. Einfach der bereits existierenden Datei mit nano hinzufügen.
aliases = {
  J = "join";
  WJOIN = "join -window";
  WQUERY = "query -window";
  LEAVE = "part";
  BYE = "quit";
  EXIT = "quit";
  SIGNOFF = "quit";
  DESCRIBE = "action";
  DATE = "time";
  HOST = "userhost";
  LAST = "lastlog";
  SAY = "msg *";
  WI = "whois";
  WII = "whois $0 $0";
  WW = "whowas";
  W = "who";
  N = "names";
  M = "msg";
  T = "topic";
  C = "clear";
  CL = "clear";
  K = "kick";
  KB = "kickban";
  KN = "knockout";
  BANS = "ban";
  B = "ban";
  MUB = "unban *";
  UB = "unban";
  IG = "ignore";
  UNIG = "unignore";
  SB = "scrollback";
  UMODE = "mode $N";
  WC = "window close";
  WN = "window new hide";
  SV = "say Irssi $J ($V) - http://irssi.org/";
  GOTO = "sb goto";
  CHAT = "dcc chat";
  RUN = "SCRIPT LOAD";
  CALC = "exec - if command -v bc >/dev/null 2>&1\\; then printf '%s=' '$*'\\; echo '$*' | bc -l\\; else echo bc was not found\\; fi";
  SBAR = "STATUSBAR";
  INVITELIST = "mode $C +I";
  Q = "QUERY";
  "MANUAL-WINDOWS" = "set use_status_window off;set autocreate_windows off;set autocreate_query_level none;set autoclose_windows off;set reuse_unused_windows on;save";
  EXEMPTLIST = "mode $C +e";
  ATAG = "WINDOW SERVER";
  UNSET = "set -clear";
  RESET = "set -default";
};
Dieser Abschnitt stellt das Aussehen des Klient-Fensters und der Balken ein. Ihr könnt dies später noch nach euren eigenen Wünschen gestalten.statusbar = {
# formats:
# when using {templates}, the template is shown only if it's argument isn't
# empty unless no argument is given. for example {sb} is printed always,
# but {sb $T} is printed only if $T isn't empty.
items = {
# start/end text in statusbars
barstart = "{sbstart}";
barend = "{sbend}";
topicbarstart = "{topicsbstart}";
topicbarend = "{topicsbend}";
# treated "normally", you could change the time/user name to whatever
time = "{sb $Z}";
user = "{sb {sbnickmode $cumode}$N{sbmode $usermode}{sbaway $A}}";
# treated specially .. window is printed with non-empty windows,
# window_empty is printed with empty windows
window = "{sb $winref:$tag/$itemname{sbmode $M}}";
window_empty = "{sb $winref{sbservertag $tag}}";
prompt = "{prompt $[.15]itemname}";
prompt_empty = "{prompt $winname}";
topic = " $topic";
topic_empty = " Irssi v$J - http://www.irssi.org";
# all of these treated specially, they're only displayed when needed
lag = "{sb Lag: $0-}";
act = "{sb Act: $0-}";
more = "-- more --";
};
# there's two type of statusbars. root statusbars are either at the top
# of the screen or at the bottom of the screen. window statusbars are at
# the top/bottom of each split window in screen.
default = {
# the "default statusbar" to be displayed at the bottom of the window.
# contains all the normal items.
window = {
disabled = "no";
# window, root
type = "window";
# top, bottom
placement = "bottom";
# number
position = "1";
# active, inactive, always
visible = "active";
# list of items in statusbar in the display order
items = {
barstart = { priority = "100"; };
time = { };
user = { };
window = { };
window_empty = { };
lag = { priority = "-1"; };
act = { priority = "10"; };
more = { priority = "-1"; alignment = "right"; };
barend = { priority = "100"; alignment = "right"; };
};
};
# statusbar to use in inactive split windows
window_inact = {
type = "window";
placement = "bottom";
position = "1";
visible = "inactive";
items = {
barstart = { priority = "100"; };
window = { };
window_empty = { };
more = { priority = "-1"; alignment = "right"; };
barend = { priority = "100"; alignment = "right"; };
};
};
# we treat input line as yet another statusbar :) It's possible to
# add other items before or after the input line item.
prompt = {
type = "root";
placement = "bottom";
# we want to be at the bottom always
position = "100";
visible = "always";
items = {
prompt = { priority = "-1"; };
prompt_empty = { priority = "-1"; };
# treated specially, this is the real input line.
input = { priority = "10"; };
};
};
# topicbar
topic = {
type = "root";
placement = "top";
position = "1";
visible = "always";
items = {
topicbarstart = { priority = "100"; };
topic = { };
topic_empty = { };
topicbarend = { priority = "100"; alignment = "right"; };
};
};
};
};
settings = {
core = { real_name = "SomeNameHere"; user_name = "YOURNICK"; nick = "YOURNICK"; };
"fe-text" = { actlist_sort = "refnum"; };
};
Speichert nun die Konfigurations Datei.
Wow... soviel Konfiguiert... viele Zeilen... viel Verwirrung.Als nächstes das Programm starten. Im Terminal irssi eingeben.
Das Terminal sollte wie folgt aussehen:
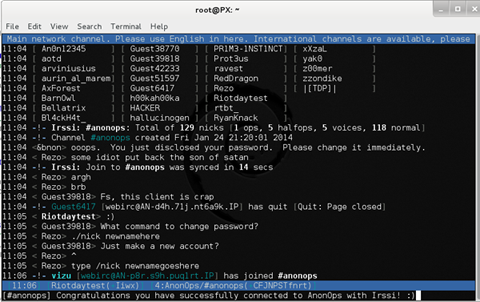
Klickt hier für ein größeres Bild.
Sieht alles gut aus? Fein. Dann habt ihr alles richtig gemacht.
Um nun zwischen den verschiedenen Kanälen hin und her wechseln zu können nutzt das /win Kommando gefolgt von der Nummer des Fensters.
/win 1
/win 2
/win 3
Etc, etc. Mit irssi könnt ihr gleichzeitig 14 Kanäle auf einmal geöffnet haben. Jede Nummer respräsentiert einen anderen Kanal.
Ihr könnt ebenfalls mit ALT + (1-9) die Fenster wechseln. Nutzt ALT + 0 um Fenster 10 anzuzeigen.
Des weiteren, mit ALT + (q-p) wechselt ihr durch die Fenster 11-20. Sollten Probleme auftreten nutzt Google oder lest das Handbuch für Informationen und Hilfestellung.
Sollte dennoch nichts zu finden sein betretet #opnewblood im AnonOps Webchat
Leitfaden und Bilder by Riotday
Edits und HTML by elmo