Xchat Azure

  1. Download Xchat Azure from the App Store or follow this link: App Store Azure
  2. Open up X-Chat Azure.
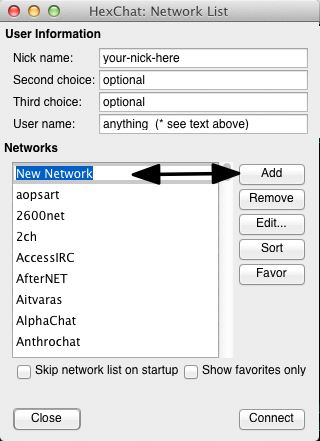
  3. Two windows should pop up, a smaller one that says "XChat: Network List" and a larger one.
  4. In the smaller window fill out the nick name and user name spaces. You will also need to change the entered real name since it will auto-fill with your the name attached to your computer (which isn't good for staying anonymous).
  5. At the bottom of the smaller window it should have buttons reading: +, -, show details, connect, connect in a new tab. Click the + button and then enter in a new network name (ex. anonops).
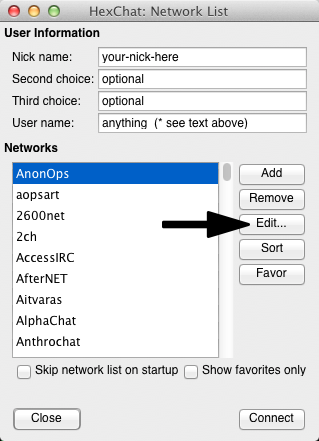
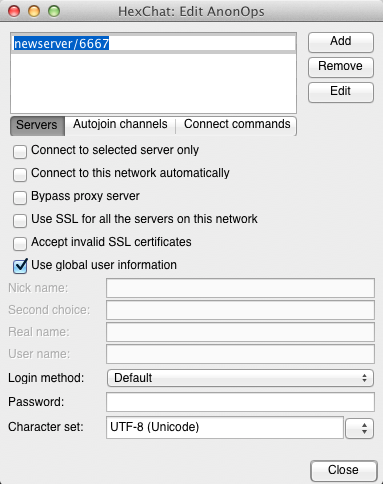
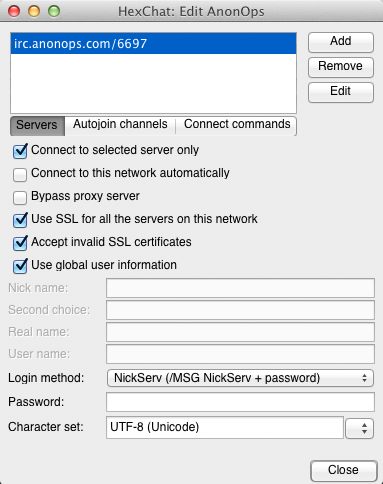
  6. Now click the "show details" button. Here you need to enter in "irc.anonops.com" in the hostname column where it says "NewServer."
  7. In the port column enter "6697" and then check the "SSL" box.
  8. Along the top of the details window click on the section marked "connecting." Here check the boxes "use SSL for all the servers on this network" and "accept invalid ssl certificate."
  9. Now in the "XChat: Network List" window you can click "hide details" and then connect. You should now be ready to register your nick etc.

Now when ever you want to connect you just highlight your created Anonops network and click connect. Also, after you register you can enter your password in the password section of the window in step 8 and it will log you in automatically.

For example setup pictures see the next section as the setup screens are similar.

Hexchat for OSX

Original Xchat still comes installed on some systems but it is severely out of date and is not being maintained. Hexchat is a fork that is being actively maintained.

Hexchat is the only "standard" Xchat that is fully compatible across the three most commonly used operating systems: Windows, Linux (Ubuntu, Mint, etc.), and Mac OSX.

As of this writing (early 2015), Hexchat for OSX is in it's first release (2.10.2 for OSX 10.9 and up) and some issues are known to exist, especially when trying to have active installations along side Xchat Azure because the directory structures are different. Scripts and other customizations are totally separate.

For example as of this writing it's Preference pane is not in the normal location; it's under the Settings menu. You won't see the chat screen until you try to connect to a network.

Hexchat for OSX can be downloaded at https://hexchat.github.io/downloads.html.

Start HexChat and a menu will open with several options.

Enter your desired nickname, username (ident), and real name (gecos).

(*)User name is your "ident" and can be the same as your nick or something else but you must know this when asked. The "real name" in the default setup is "realname." You can change this in Settings>Preferences>Advanced>Miscellaneous. This can be anything you want OTHER than your real name.

Click Add and enter a name for the IRC network (such as AnonOpsIRC) and press Enter.

Hexchat first window

You should then see this:

Hexchat setup example

Click Edit.. and a new window opens:

Hexchat setup example

At the top you will see newserver/6667 Replace that with irc.anonops.com/6697 and press Enter (or tab). (If you fail to press enter the server name will not be saved.)

Mark the following checkboxes:

  • Connect to the selected server only.
  • Use SSL for all the servers on this network.
  • Accept invalid SSL certificates.
  • Check use global user information (unless you use different nicks for other networks).

Your setup screen should now look like this:

Hexchat setup example

Click Close and then click Connect.

Using Tor with Xchat Azure or Hexchat

You must be approved by our network staff to use Tor on our network. If you are unclear on the requirements please refer back to https://newblood.anonops.com/tor.html#anonops.

After you have obtained access to the Tor server you will need to make some changes to the setup of Xchat Azure. Using the directions above, make a New Network like AnonopsTor (or whatever you choose) that will be used with Tor since the server address and port are different. The server will be anonops532vcpz6z.onion and the port is 443. Make sure the User Name under your nickname is the username(ident) you have registered for Tor.

Then open Xchat Azure preferences and select Network Setup. Where it says Proxy Server enter:

  • localhost
  • 9150
  • SOCKS5
  • All Connections

in that order. Change nothing else on that page. Click OK. You should now be able to connect using Tor.

You must have Tor running before trying to connect to IRC or it will fail.

Important: To go back to a non-Tor network you will have to come back to this preference and choose (disabled) for the proxy type. You can leave the other fields as they are.

Xchat Azure is compliant with all Xchat standard commands and can be used to connect to both Tor and non-Tor servers at the same time (Tor must be running!) by using the command line in a new Server tab. This is useful for testing your Tor setup while requesting Tor access with our network. For an example of this please see https://anonops.com/xchat.html.

Colloquy

Colloquy is a graphical IRC client for Macs that can be somewhat easier for beginners to use. Adhering to Mac OS X interface conventions, Colloquy has the look and feel of a quality Mac application. It is not recommended for power users.

There is a mobile version for iOS available for a nominal fee. http://colloquy.mobi/

  1. Download Colloquy from the following link: Colloquy
  2. Open Colloquy.
  3. A Connections window will open.
  4. Click New and a New Connection window will open.
  5. Type the Nickname you want. Server protocol is IRC. Chat Server type in irc.anonops.com
  6. Now click the "details" button and check the box "Remember this connection."
  7. In the port column enter "6697" and then check the "SSL" box.
  8. Username: just make up something. This is not your nick, but it can be.
  9. Server Password: leave blank (this is not your nick register password.)
  10. Real Name: obviously NOT.
  11. Click Connect.
  12. A bigger window should open but if not, highlight your new connection in the Connections window and click Console. There you should see status messages showing you connecting to the server. At the bottom is the dialog box and you can type /list or /join #chanyouwant.

Now whenever you want to connect you just highlight your created Anonops network and click connect.

After you register your nick, the next time you connect Colloquy will ask for the password you set, and here you can check the box to remember your password and it will log you in automatically.

You can fine tune your connection details by highlighting the connection in the Connections window and click Info. Here you can see your password and other info. Click the Automatic tab and select "Open Console on connect" if desired. You can also automatically join rooms listed here.

Colloquy weirdness: Sometimes after clicking connect, nothing seems to be happening. Wait a bit, sometimes it takes a while to connect.

Other Clients

There are many graphical IRC clients for Macs. Textual, Linkinus, Snak, Limechat, Adium, etc., all trying to give the most modern and Mac-like experience.

Any of these will work for casual use and may be more comfortable for those who are not used to the "Old School" look of text-based chat. It is precisely this "Old School" look and feel that makes it so endearing to those of us who use it regularly. We encourage you to embrace the primitive nature of IRC as it has stood the test of time. It is the original internet chat protocol.

**Note: The terminal-based and much loved/hated client IRSSI is available from source and must be compiled for OSX. There is no binary available.